
I use a three-pronged approach to backup up my Ubuntu Linodes:
- I use Linode's own backup service
- Duplicati to back up specific directories & mysqldump of my databases
- Nakivo Backup to back up an image of each node to my QNAP NAS
For an overview of my backup strategy, as well as alternative software and solutions, see my post "Backing up a Headless Ubuntu Web Server (to Cloud & QNAP NAS)".
Misleading pricing on Nakivo's website?
Unfortunately, only after getting it all to work did I notice this little pop-up on Nakivo's website:
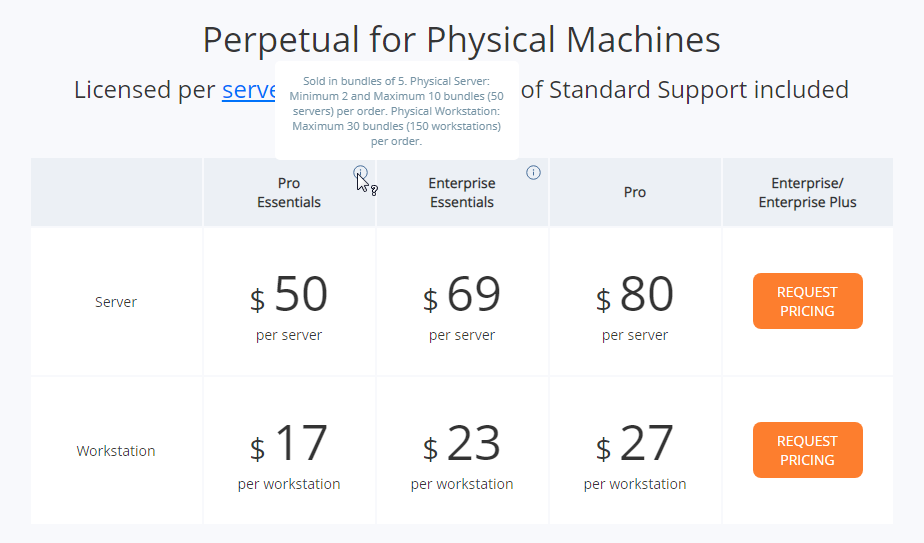
So, whereas on first glance you might think that a perpetual "Pro Essentials" license for a linux server would be $50, in fact you have to pay for "2 bundles of 5 servers", or $500!
If this doesn't bother you, or you are open to signing up for their subscription service (which is reasonably priced at $25/year/server but also with a minimum order of 10 licenses), then read on...
Setting up Nakivo Transporter on your Linode from your QNAP NAS
Before you start, install Nakivo Backup from the QNAP App Center:
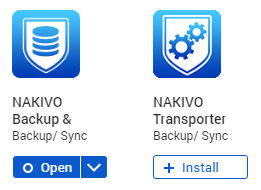
You only need Nakivo Backup on your NAS. Install Nakivo Transporter only if you wish to use your server as a source for backup data, and you have the full Nakivo Backup program installed somewhere else.
The transporter component will have to be installed on your node, but Nakivo Backup will do that for you.
(1) Enable un/pw auth on your node
If you have a properly secured Linode, then you have username/password auth turned off. You will have to temporarily enable it for Nakivo to be able to log into the machine and install the transporter.
Although you could manually install the transporter on your node following Nakivo's docs, this is not useful because when you then try to add the machine in Nakivo Backup, it will try to install it again and complain that the transporter is already installed.
You could also use a private key with Nakivo, and then follow Nakivo's docs which instruct you as follows: "If you generated your key with a passphrase, you have to enter this passphrase into the password and repeat password boxes." But, this doesn't work, because the first thing Nakivo tries to execute is this: sudo bash -c set -e && set -o pipefail && [ -f "/etc/os-release" ] && cat /etc/os-release | grep '^ID=' | sed 's/[^=]*= *//' || ls but this fails because sudo asks for a password and Nakivo doesn't seem to supply it. So it seems to me that Nakivo simply didn't consider the possibility of using a private key along with sudo asking for a password. Bummer.
So, just enable username/password auth for your specific IP.
sudo vi /etc/ssh/sshd_configLeave the line "PasswordAuthentication no" as is and add the following to the end of the file:
# Settings that override the global settings for matching IP addresses only
# Allow un/pw auth for home NAS:
Match address 111.222.333.444
    PasswordAuthentication yes
Save the file & reload sshd to apply:
sudo service sshd restart(2) Allow Nakivo through your Firewall
You can configure which ports the transporter uses in Nakivo Backup:
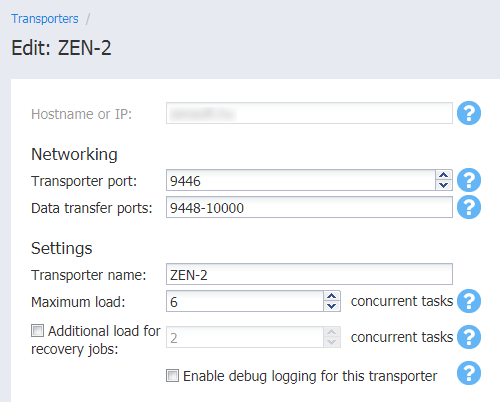
The default ports are as you see above. You will have to allow I use UFW so for me this was simple enough:
sudo ufw allow from 111.222.333.0/24 to any port 9446:10000 proto tcpIf you have a fix IP address you can specify that, or a subnet as I did. See How To Set Up a Firewall with UFW on Ubuntu 14.04 for help on setting up and using UFW.
Bonus: allow Nakivo through your Firewall using Dynamic IP Address
If you don't have a static IP address, you can use the method described in UFW: Allow traffic only from a domain with dynamic IP address.
Use a dynamic DNS service to keep a pointer to your IP address and then create a script such as the following:
#!/bin/bash
HOSTNAME=YOUR-DYNAMIC-DOMAIN
COMMENT=$HOSTNAME-Nakivo

if [[ $EUID -ne 0 ]]; then
   echo "This script must be run as root"
   exit 1
fi

new_ip=$(host $HOSTNAME | head -n1 | cut -f4 -d ' ')
old_ip=$(/usr/sbin/ufw status | grep $COMMENT | head -n1 | tr -s ' ' | cut -f3 -d ' ')

if [ "$new_ip" = "$old_ip" ] ; then
    echo IP address has not changed
else
    if [ -n "$old_ip" ] ; then
        /usr/sbin/ufw delete allow from $old_ip to any port 9446:10000 proto tcp
    fi
    /usr/sbin/ufw allow from $new_ip to any port 9446:10000 proto tcp comment $COMMENT
    echo iptables have been updated
fi
Make sure to update "YOUR-DYNAMIC-DOMAIN". Then create a cron job (in /etc/cron.d):
SHELL=/bin/sh
PATH=/usr/local/sbin:/usr/local/bin:/sbin:/bin:/usr/sbin:/usr/bin

*/5 * * * * root { printf "\%s: " "$(date "+\%Y-\%m-\%d \%H:\%M:\%S")"; /home/USER/backup/ufw_allow_nakivo.sh ; } >>/home/USER/backup/log/ufw_allow_nakivo.log 2>&1
If you have your domain at Google Domains, you can easily set your up your QNAP NAS to update the record dynamically.
Google's article on the topic: Learn about Dynamic DNS
In your NAS, Control Panel → Network & Virtual Switch → DDNS, add:
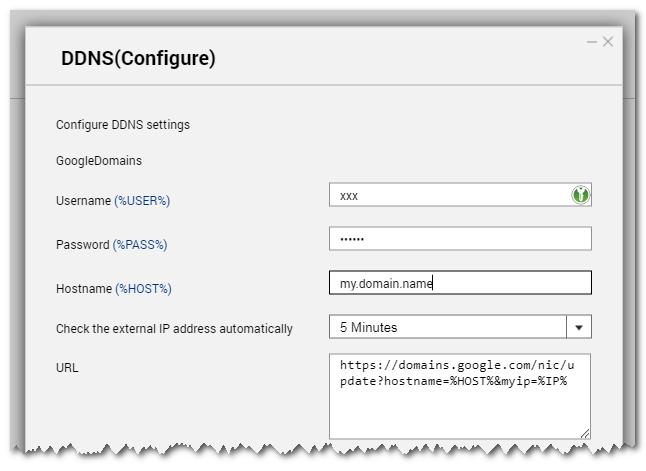
in Google Domains on the DNS panel open "Advanced Settings" to add the dynamic domain name.
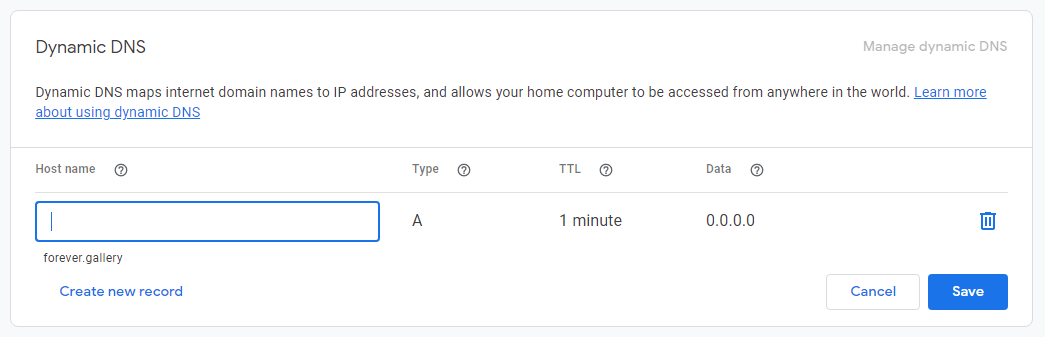
Once created, click "View Credentials" to get the credentials you need to enter into QNAP:

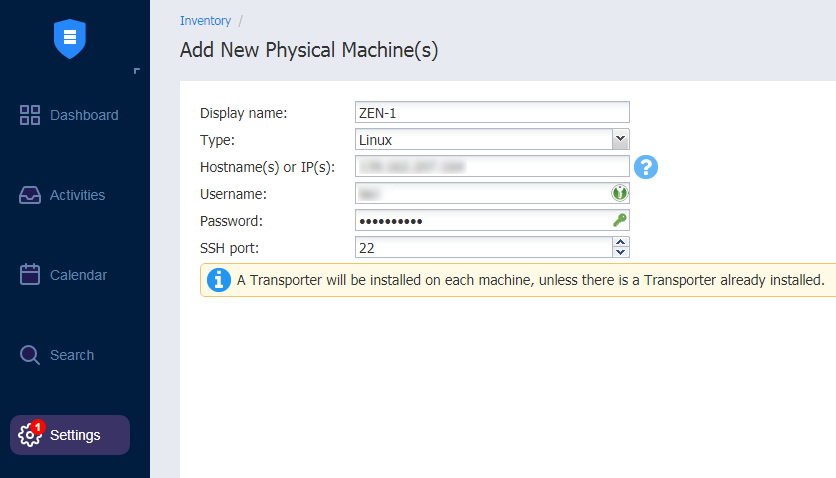
(3) Register the machine with Nakivo Backup
Open Nakivo Backup on your NAS and go to Settings → Inventory to add a new machine. Specify the display name, type, hostname etc.
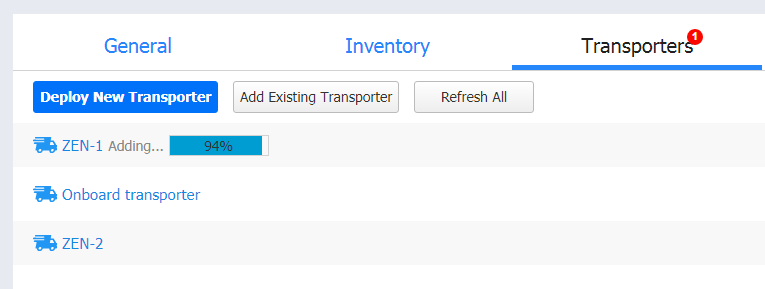
It will take a few minutes for the transporter to be installed. Be patient.

You can check the progress of the installation of the transporter on the "Transporters" tab:
(4) Disable un/pw auth on your node!
Once Nakivo backup installs the transporter, you no longer need username/password authentication to be enabled on your node.
Done!
You can now define a new backup for your machine (Dashboard → Create → Physical machine backup), set up email alerts (Settings → General → Email Notifications), run a backup & dry-run a restore.
Tip: when creating your backup job, on the "Destination" page, click Advanced options...
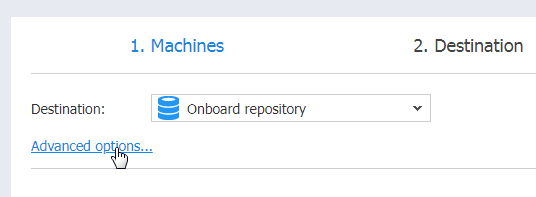
...and now you can exclude a disk from the backup:

Also, make sure to just use the "Onboard repository". I tried creating a dedicated partition on the NAS, adding it as a target storage destination, but after I created backups there, I was unable to recover any files from the repository. Quite scary! So just use the "Onboard repository".
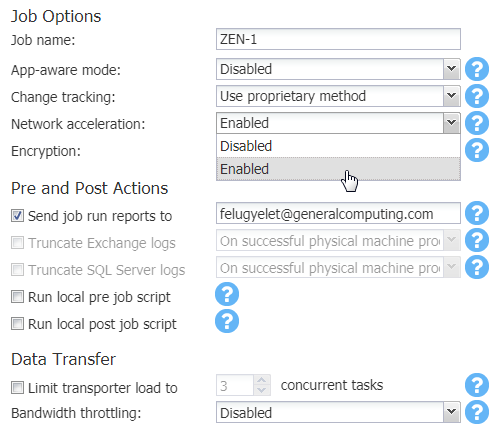
I also recommend enabling Network acceleration on the options page:
Nakivo has several outstanding security vulnerabilities at the moment, so consider reviewing Nakivo's Security Considerations before calling it a day.
